Hiking in Israel
Hiking in Israel Tips
If you like the thought of hiking in Israel but don’t know where to start, we are here to help. We’ve gathered a significant amount of tips for hiking in the Holy Land = excellent information on what you need to learn, obtain, and do:
- Trail blazes: Learn to recognize Israel National Trail color markers which are orange, blue and white, as opposed to other trail markers, which consist of two white lines and a different color in between.
- Weather forecast: Some Israeli trails can be dangerous in rainy weather, while heat waves make all walks much more strenuous. In general, hiking in Israel is best from mid-February until mid-May and from September until mid-December, when the weather is less extreme.
- Map: Obtain a good 1:50,000-scale map, available in Hebrew at the SPNI or at any camping store in Israel.
- Guidebook: Jacob Saar has written the only English guidebook for the Israel National Trail, including many topographical maps and recommended hikes.
- Get Fit: If you have the time, you might consider practicing walking with a backpack to build up your stamina before your official hike. It’s highly recommended to start the trail from the North and head southwards, because the Northern section is less challenging, and by the time you reach the desert you’ll still have plenty of strength to face the steep climbs and cope with the desert temperatures.
- Tell people: Let people know where you are planning to hike, when and where you plan to check in, and when you are due back.

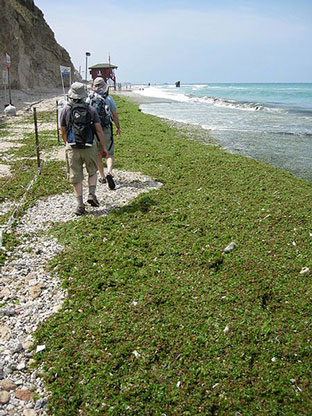
Walking the Trail Along the Coast (Photo: Yoav Dothan, CC BY-SA 3.0)
Hiking in Israel: Water Supplies
Bring plenty of water. The amount needed varies by season.
Winter:
2 liters a day per person is sufficient.
Summer:
4 liters a day per person is sufficient, but in the desert you need a liter of water per hour of walking. From Dan in the north all the way to Arad there is water available, and reasonably spaced along the trail, so even if it’s very hot you should be able to manage with the water you carry in addition to the water available on the trail. However, in the desert from Arad southwards all the way to Eilat, you’ll need to ensure that you have established pre-prepared drinking-water stations along the trail.
Israel National Trail
-
If you are hiking the Israel National Trail, choose sensible spots to hide water and take it there by car before your hike – directions and maps will give you a good idea of the recommended locations. You need to find a place that is difficult for others to find but easy for you to remember. You should bring a small shovel or pickaxe to dig out the water from the hiding places. If you are hiking straight through from Arad to Eilat you can expect to need around ten water caches.
-
Make use of one of the water caching services offered by the locals. These services are not free of charge, although if you go together with a group you can significantly reduce the cost. You should call well in advance in order to be able to go with a group.
-
At some locations close to towns you can call a taxi, asking the driver to bring a couple of six-packs of water. This way you avoid having to hide your cache, and you don’t have to worry it might get taken or that you might not find it. Generally this is no more expensive than using a water caching service. At the bottom of the page is a list of taxi services in the desert.

Israel National Trail, Carmel Mountains (Photo: Ramessos, CC BY-SA 3.0)
Hiking in Israel Packing Tips
Pack the following:
-
Good comfortable hiking shoes. You don’t need waterproof boots on the Israel National Trail, but pack waterproof sandals to take advantage of the swimming opportunities
-
A hat
-
A poncho during the rainy season
-
A comfortable hiker’s backpack. An average light hiker should expect to carry up to 12kg on the Israel National Trail, which includes the weight of the backpack itself, a tent and sleeping accessories, and 3kg of water (depending on the season).
-
Food, including entire meals and high-energy snacks
-
A fully-charged cell phone
-
Mosquito repellent
-
Sunglasses/spare prescription glasses
-
A camera
-
A little cash as well as a credit card
-
ID papers
-
Basic first aid kit (be familiar with administering first aid)
-
Flashlight with new batteries
Hiking in Israel Safety
-
Plan your hikes responsibly so that you will not be out on the trail in the dark. Work out how long the route is and how much ground you can expect to cover given the season and the weather conditions. Because the winter daylight hours are shorter, your hiking time will be shorter.
-
Hiking in a group is preferable to going it alone, not because the trail is dangerous but simply because if emergencies arise, or in case you get lost, others in the group will be on hand to help.
- To avoid developing blisters, break-in your shoes before you start, using them every day for at least two weeks before hiking with them.
-
As soon as you feel discomfort, or when your shoes start to rub, stop for a rest. Take off your shoes and put on a band aid (plaster).
-
If you do develop a blister, there are band aids specifically designed for them; pack some just in case, but they can’t fix the problem – they merely help limit the pain.
- If you lose the trail (which is common), do not just continue onwards because the path could be unsafe; turn around and go back to the last trail marker you saw. From there, try to understand which way you should have gone. It could be that the trail made a sudden turn, which you did not notice the first time around.
-
If you can’t find the last trail marker, try each possibility cautiously, going a short distance until it becomes clear which route to take.
-
If you are still lost, take out your map and make your way to a landmark, road, or town which the trail crosses.

Ein Akev Junction (Photo: Yoav D, Public Domain)
Hiking Trails in Israel – Trail Angels
Some of the kind-hearted people who live close to the Israel National Trail try to make your hike as comfortable as possible, opening their homes (or at least their backyards) to hikers for overnight stays. Some offer showers, phone recharging, and perhaps even hot meals and Internet usage. At some places you will be charged a small fee for these services.
You must give at least 48 hours notice prior to your arrival. Also, some of the Trail Angels observe the Shabbat (Saturday) and all other Jewish holidays, which means you will not be able to contact them from an hour before sunset on Friday until an hour or two after sunset on Saturday. The same goes for the holidays – Pesach, Shavuot, Sukkot, Rosh Hashanah and Yom Kippur. The list points out which angels observe Shabbat, and unless otherwise indicated, at those angels you will be kindly asked to arrive no later than an hour before sunset on Friday and not to leave until at least an hour after sunset on Saturday.
Israel Trail Passport
Of particular interest to those wishing to hike the entirety of the Israel trail, a “passport” can be obtained at the maps shop at 2 Ha’Negev Street, Tel Aviv. Alternatively, you can call the SPNI (+972 – 3 – 638-8719), which will send you one. At various locations along the trail you can pick up stamps to fill up the passport, which also serve as souvenirs of the many and varied points of interest. “Passport” holders can obtain discounts on accommodations at field schools and youth hostels along the trail, and can also expect to be given priority by Trail Angels.
Happy Hiking!